> ## Documentation Index
> Fetch the complete documentation index at: https://docs.getjumper.io/llms.txt
> Use this file to discover all available pages before exploring further.
# Enterprise overview
> How Jumper Enterprise simplifies editor onboarding, restricts access to production analysis, and controls available features.
The **Enterprise Admin Panel** lets your team prepare Jumper once and apply that setup to every editor's license. Editors open Jumper to prepared media, the right models, and named people and speakers.
Use it to onboard editors without per-machine setup, limit each license to specific productions, and choose which tabs each role can use.
The Admin Panel is available with **Jumper Enterprise**, which includes everything in Pro plus centrally managed license policies, configurations, and company single sign-on (SSO).
## How it fits together
The Admin Panel has four sections:
* **Licenses:** assign policies to individual licenses or several licenses at once.
* **Policies:** control which Jumper tabs and analysis folders those licenses can use.
* **Configuration:** send a prepared Jumper setup to selected licenses.
* **Company SSO:** connect your organization's identity provider for company sign-in.
Policies define what an editor can access. Configurations provide the settings and saved state they start with. They don't include media or analysis files, which stay in your storage. Use both to prepare a working setup with the appropriate access for each role or production.
For example, editors working on **Show A** and **Show B** can be limited to those shows' analysis folders and given access to Search. The team responsible for analysis and naming people keeps access to Media and People.
## Simplify editor onboarding
An admin or assistant editor prepares the media, models, analysis, people and speaker names, and UI settings once, then sends the configuration to the editors' licenses. Editors activate their license and Jumper applies the setup automatically, including downloading the configured models.
Once setup finishes, editors can search the prepared footage. Give them access to Search and [Tag Collections](/guides/tag-collections) so they can find clips, save selects, and use those collections to narrow later searches.
## Restrict access to sensitive productions
Editors in the same facility may work on different shows with different access requirements. Analysis folders can contain thumbnails, transcripts, and other information from the footage, so access to those folders matters even when the original media is restricted.
Keep each production's analysis in a separate folder and assign policies that allow only the folders each license needs. An editor working on Show A can be limited to Show A's analysis, while another editor has access to Show B.
Set matching permissions on your shared storage as well. See [confidential footage and project-specific analysis folders](/guides/shared-analysis#confidential-footage-and-project-specific-analysis-folders).
## Choose the features each role can use
Keep analysis and setup controls with the team responsible for them. For example, enable **Search**, **Tags**, and **Help** for editors while disabling **Media**, **People**, and **Settings**. This keeps the interface focused on finding footage and prevents those licenses from starting analysis, regrouping face collections, or changing models through those controls.
Assistant editors can retain the tabs they need to analyze new footage, manage face collections, and maintain the setup. Policies control access by tab. Search still allows editors to rename transcript speakers, and Tags lets them save and update Tag Collections.
## What the editor sees
On a new machine, the editor opens Jumper, enters their assigned Enterprise license key, and clicks **Apply**. Jumper then runs the organization setup automatically:
1. Load the license's organization policy.
2. Download the settings bundle and import the managed settings.
3. Download the configured models and activate the visual model.
4. Load an allowed analysis folder.
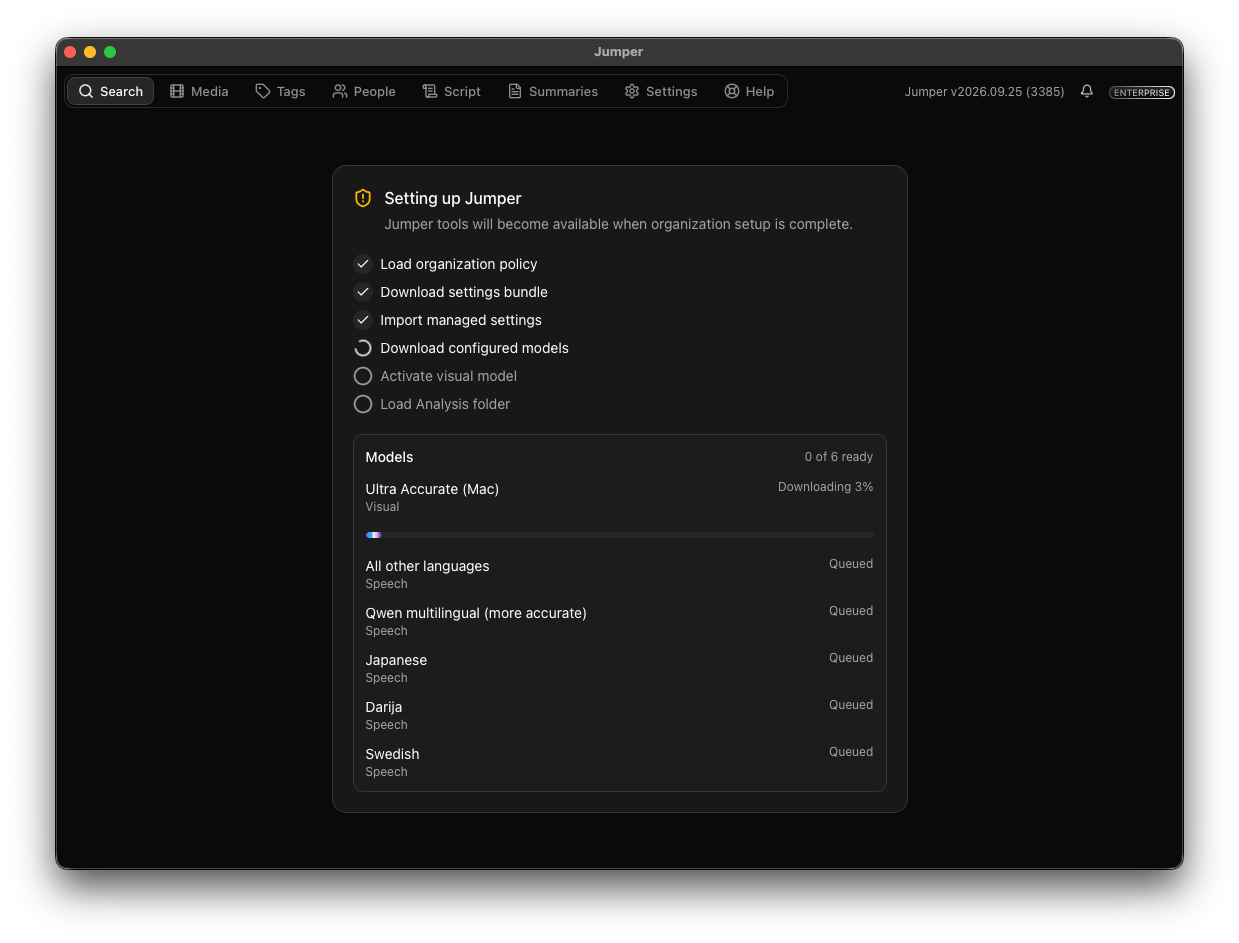 The first setup can take time while models download. When **Jumper is ready** appears, the editor clicks **OK** and starts searching the prepared media.
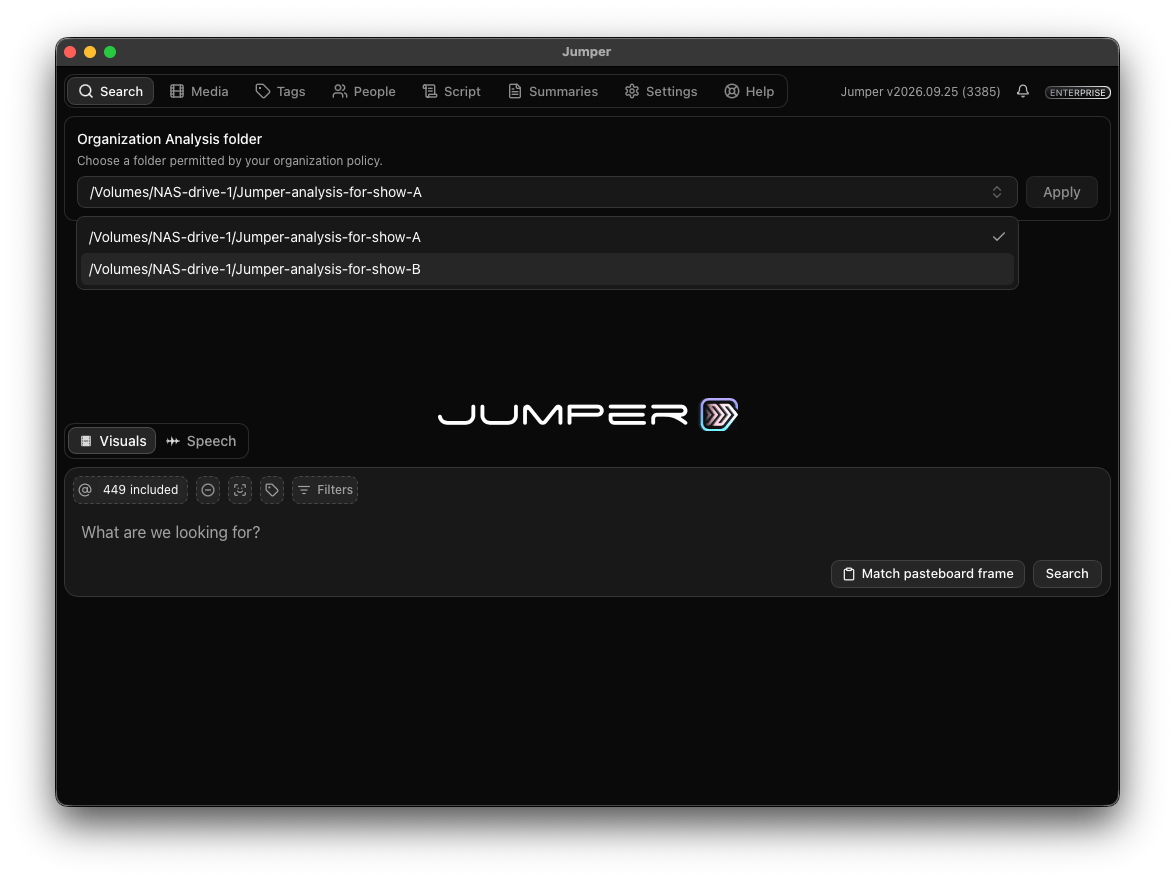
The assigned policy determines which tabs the editor can use. When several analysis folders are permitted, the editor can switch between them with the **Organization Analysis folder** selector. In the example below, only the Show A and Show B folders are available.
The first setup can take time while models download. When **Jumper is ready** appears, the editor clicks **OK** and starts searching the prepared media.
The assigned policy determines which tabs the editor can use. When several analysis folders are permitted, the editor can switch between them with the **Organization Analysis folder** selector. In the example below, only the Show A and Show B folders are available.
 **In progress:** Remote Viewing and a floating license server. These features are not yet available. The existing [custom license server](/guides/custom-license-server) lets clients validate their individual license keys through a local server. It does not provide a pool of floating seats.
## Set it up
Configure Jumper on the admin's machine.
Control tabs and analysis folders per license.
Distribute the prepared setup to licenses.
Connect your identity provider.
This documentation is built and hosted on [Mintlify](https://mintlify.com), a developer documentation platform.
**In progress:** Remote Viewing and a floating license server. These features are not yet available. The existing [custom license server](/guides/custom-license-server) lets clients validate their individual license keys through a local server. It does not provide a pool of floating seats.
## Set it up
Configure Jumper on the admin's machine.
Control tabs and analysis folders per license.
Distribute the prepared setup to licenses.
Connect your identity provider.
This documentation is built and hosted on [Mintlify](https://mintlify.com), a developer documentation platform.