> ## Documentation Index
> Fetch the complete documentation index at: https://docs.getjumper.io/llms.txt
> Use this file to discover all available pages before exploring further.
# Enterprise Admin Panel
> Prepare Jumper for your editors, assign license policies, distribute configurations, and set up company SSO.
An editor joins a production and opens Jumper for the first time. The media is already loaded, the right models are selected, and people and transcript speakers already have names. Once automatic setup finishes, the editor can start searching without analyzing footage or learning how to configure Jumper.
With the **Enterprise Admin Panel**, an admin prepares this experience in advance: load the desired media into Jumper, set the analysis folder, download and load the models, analyze the footage, name people and speakers, and choose the UI settings. The admin then assigns access policies and sends the prepared configuration to the editors' licenses. Each editor gets the setup they need when they activate their license.
For example, editors working on **Show A** and **Show B** can be limited to those shows' analysis folders and given access to Search, while the team responsible for analysis and naming people keeps access to Media and People.
The Admin Panel is available with **Jumper Enterprise**, which includes everything in Pro plus centrally managed license policies, configurations, and company single sign-on (SSO).
## What you manage
| Admin Panel section | What it does |
| - | - |
| **Licenses** | Assign policies to individual licenses or several licenses at once. |
| **Policies** | Control which Jumper tabs and analysis folders those licenses can use. |
| **Configuration** | Send a prepared Jumper setup to selected licenses, using this machine's settings or an exported ZIP file. |
| **Company SSO** | Connect your organization's identity provider for company sign-in. |
Policies define what an editor can access. Configurations provide the settings and saved state they start with. Use both to prepare a working setup with the appropriate access for each role or production.
## Prepare a working setup
On the admin's machine, configure Jumper as you want your editors to use it:
1. Set the [analysis folder](/interface/settings-tab#analysis-folder) to the location containing the production's analysis data. For a team, use a [shared analysis folder](/guides/shared-analysis).
2. Download the required models and load the visual model you want editors to use. Use the same visual model that was used to analyze the footage.
3. Add the desired media to Jumper and [analyze it](/core-concepts/processing), or load the existing analysis.
4. Give names to people in [face analysis](/guides/face-detection) and to detected speakers in [transcripts](/core-concepts/speech-search).
5. Choose the [UI settings](/interface/settings-tab), such as the number of search results and how result thumbnails appear.
6. Try a search to confirm that the prepared media and analysis work together.
The configuration distributes settings and saved state. The media files and analysis data stay in your storage, so each editor's machine needs access to them. Make sure shared drives are mounted and the configured paths are available before the editor starts. The policy controls which analysis folders Jumper allows the license to use.
## Open the Admin Panel
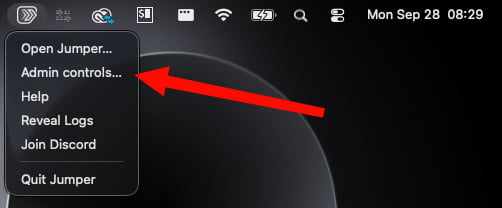
Select **Admin controls…** from Jumper's menu. The screenshot below shows the macOS menu bar menu.
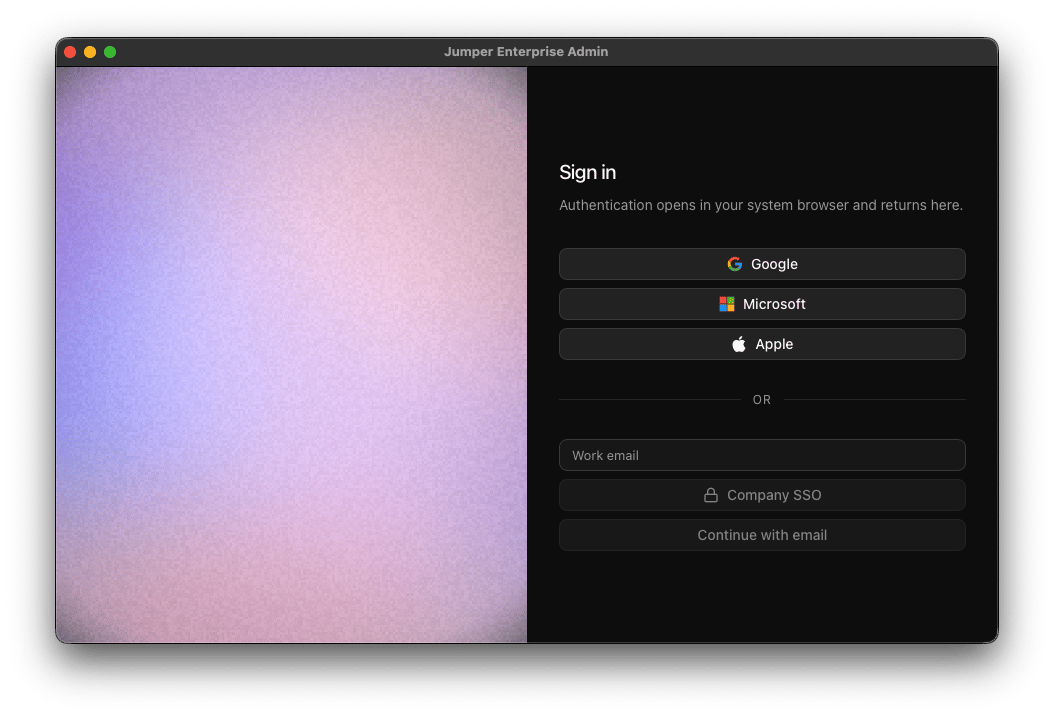
 Sign in with the account that manages your organization's Enterprise licenses. Authentication opens in your system browser and returns to the Admin Panel. The sign-in screen offers Google, Microsoft, Apple, email, and **Company SSO** when configured.
 ## Create an access policy
A policy can represent a role, a production, or a combination of the two. For example, create a policy for editors who should search Show A and Show B without changing their analysis or face collections.
1. Open **Policies** and select **New**.
2. Give the policy a descriptive **Name**.
3. Under **Accessible tabs**, enable the tabs those licenses should be able to open.
4. Under **Analysis folders**, choose **Specific folders** and use **Enter a path** to add the allowed analysis locations, or choose **Any folder** for unrestricted folder access.
5. Select **Create policy**.
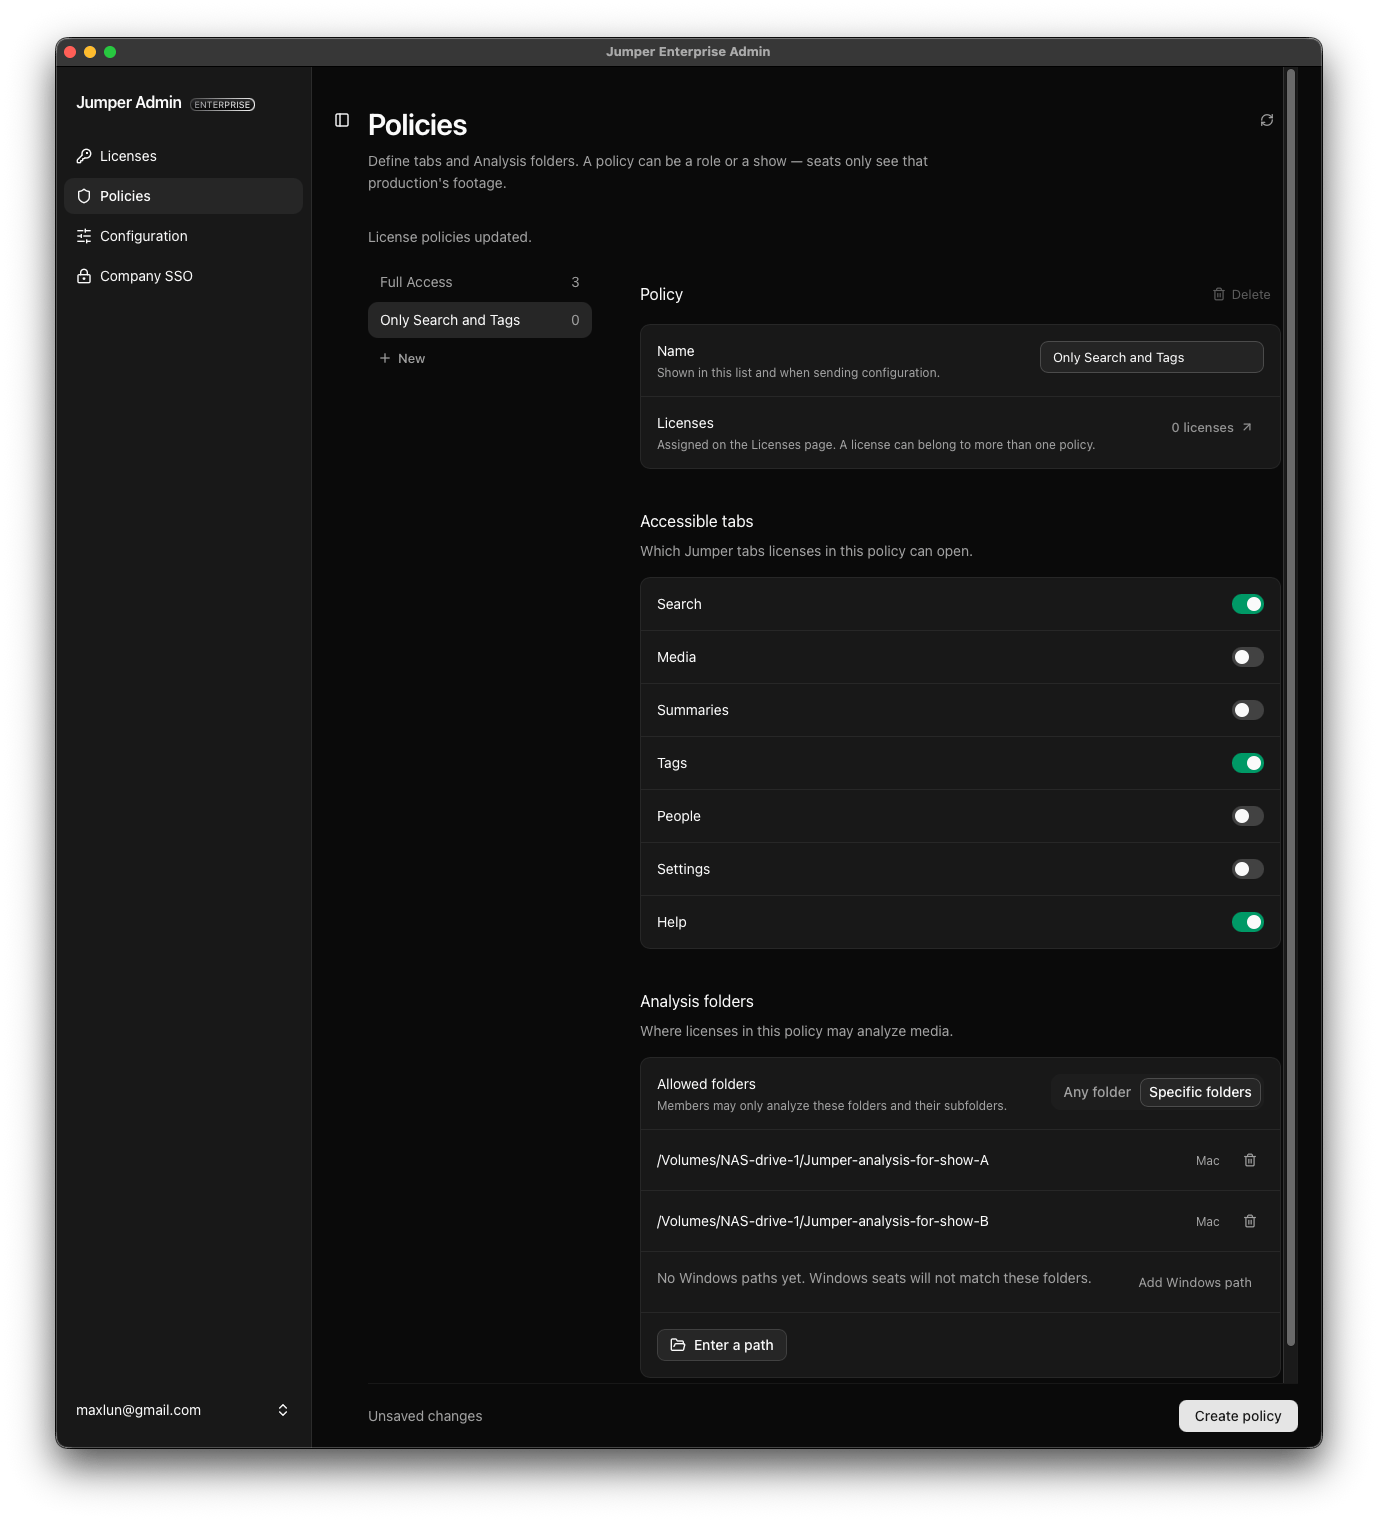
To provide search access without analysis or face collection management, enable **Search** and disable **Media** and **People**. You can also control access to **Summaries**, **Tags**, **Settings**, and **Help**. The example below enables Search, Tags, and Help.
## Create an access policy
A policy can represent a role, a production, or a combination of the two. For example, create a policy for editors who should search Show A and Show B without changing their analysis or face collections.
1. Open **Policies** and select **New**.
2. Give the policy a descriptive **Name**.
3. Under **Accessible tabs**, enable the tabs those licenses should be able to open.
4. Under **Analysis folders**, choose **Specific folders** and use **Enter a path** to add the allowed analysis locations, or choose **Any folder** for unrestricted folder access.
5. Select **Create policy**.
To provide search access without analysis or face collection management, enable **Search** and disable **Media** and **People**. You can also control access to **Summaries**, **Tags**, **Settings**, and **Help**. The example below enables Search, Tags, and Help.
 ### Limit access by production
Add the analysis folders for **Show A** and **Show B** to the policy, leaving out Show C. Licenses assigned to that policy can then use the allowed folders and their subfolders in Jumper.
Use paths as they appear on the editors' machines. For a team using both macOS and Windows, add the corresponding paths for both platforms. A macOS path alone will not match a Windows machine; the policy editor prompts you to add the missing platform's path.
Keep your shared storage permissions aligned with the same production access rules. See [project-specific analysis folders](/guides/shared-analysis#confidential-footage-and-project-specific-analysis-folders) for the storage setup.
## Assign policies to licenses
Open **Licenses** to see your organization's seats and their assigned policies. Use the policy dropdown beneath a license to change its memberships. You can also select multiple licenses and apply a policy to them together.
### Limit access by production
Add the analysis folders for **Show A** and **Show B** to the policy, leaving out Show C. Licenses assigned to that policy can then use the allowed folders and their subfolders in Jumper.
Use paths as they appear on the editors' machines. For a team using both macOS and Windows, add the corresponding paths for both platforms. A macOS path alone will not match a Windows machine; the policy editor prompts you to add the missing platform's path.
Keep your shared storage permissions aligned with the same production access rules. See [project-specific analysis folders](/guides/shared-analysis#confidential-footage-and-project-specific-analysis-folders) for the storage setup.
## Assign policies to licenses
Open **Licenses** to see your organization's seats and their assigned policies. Use the policy dropdown beneath a license to change its memberships. You can also select multiple licenses and apply a policy to them together.
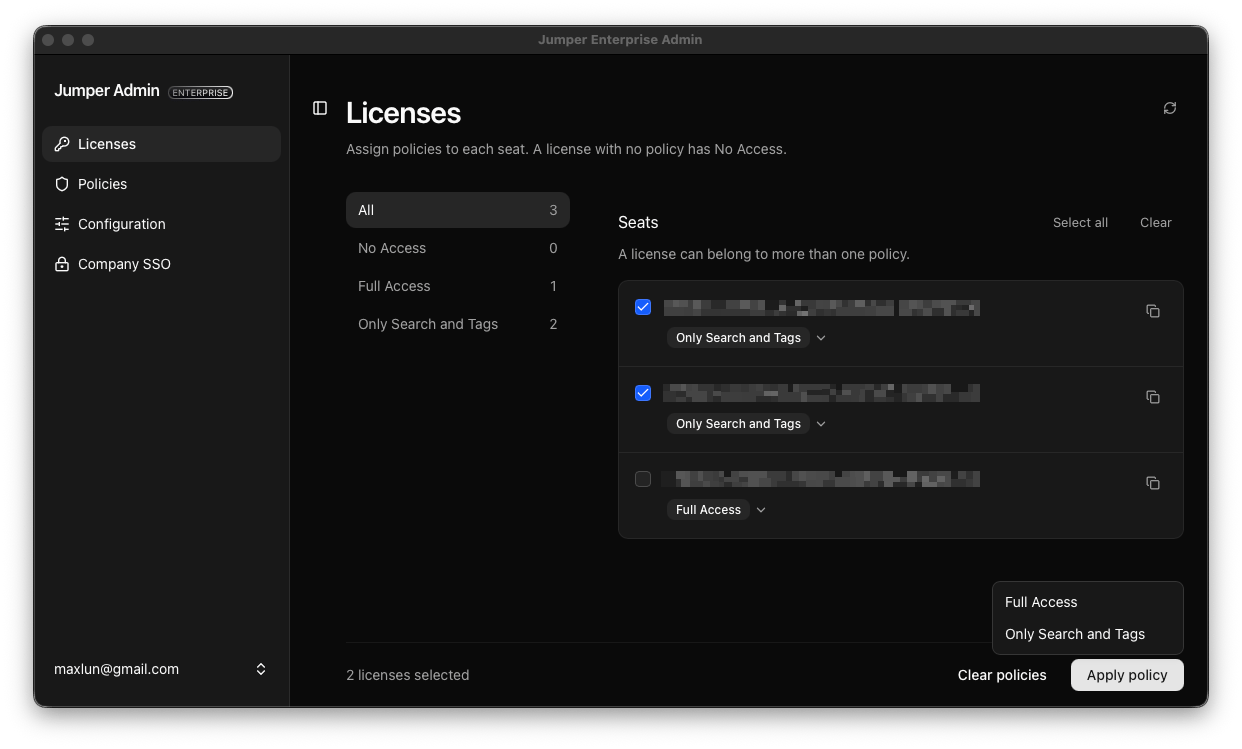 A license can belong to more than one policy, and the access granted by those policies is combined. When restricting a license, remove **Full Access** and any other policy that grants access beyond what that editor needs.
A license with no assigned policy has **No Access**. Assign a policy before handing the license to an editor. Sending a configuration alone does not grant access.
## Send the configuration
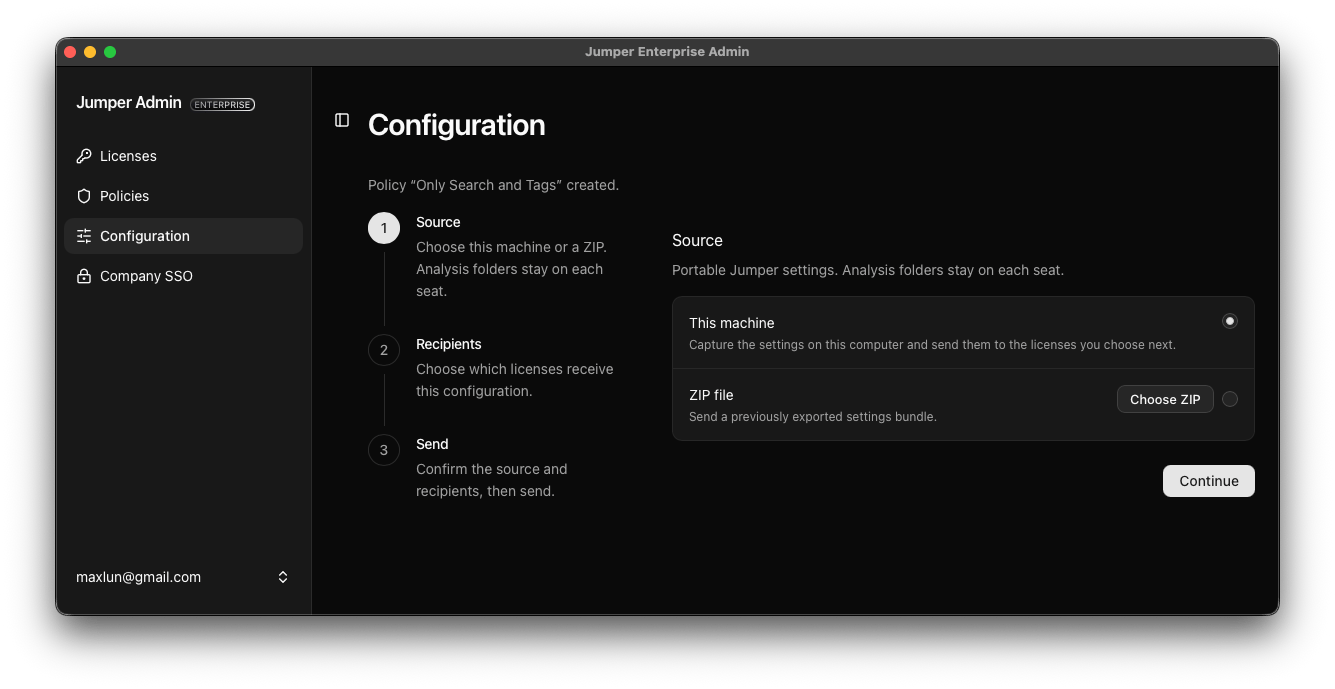
Once the setup is ready and the licenses have the right policies, open **Configuration**.
Select **This machine** to capture the Jumper setup you prepared, or choose **ZIP file** and select a previously [exported settings bundle](/interface/settings-tab#export-and-import-settings). Click **Continue**.
A license can belong to more than one policy, and the access granted by those policies is combined. When restricting a license, remove **Full Access** and any other policy that grants access beyond what that editor needs.
A license with no assigned policy has **No Access**. Assign a policy before handing the license to an editor. Sending a configuration alone does not grant access.
## Send the configuration
Once the setup is ready and the licenses have the right policies, open **Configuration**.
Select **This machine** to capture the Jumper setup you prepared, or choose **ZIP file** and select a previously [exported settings bundle](/interface/settings-tab#export-and-import-settings). Click **Continue**.
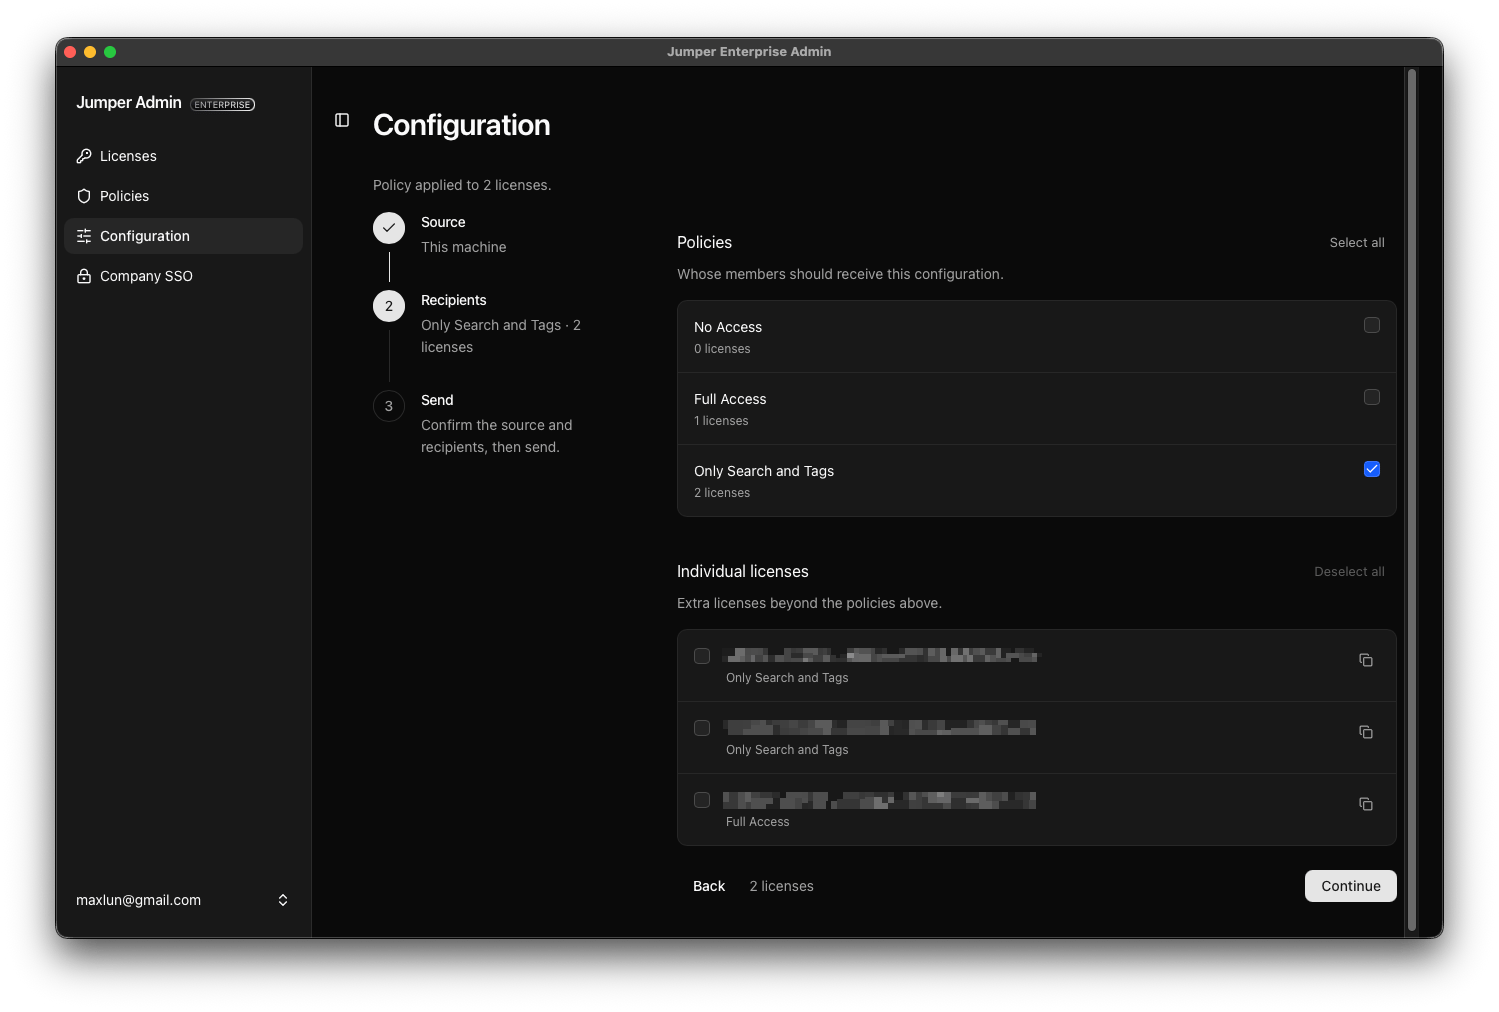
 Select policies to send the configuration to their current members. Under **Individual licenses**, you can add recipients beyond those policies. Check the total number of licenses, then click **Continue**.
In this example, both licenses in the **Only Search and Tags** policy receive the same setup.
Select policies to send the configuration to their current members. Under **Individual licenses**, you can add recipients beyond those policies. Check the total number of licenses, then click **Continue**.
In this example, both licenses in the **Only Search and Tags** policy receive the same setup.
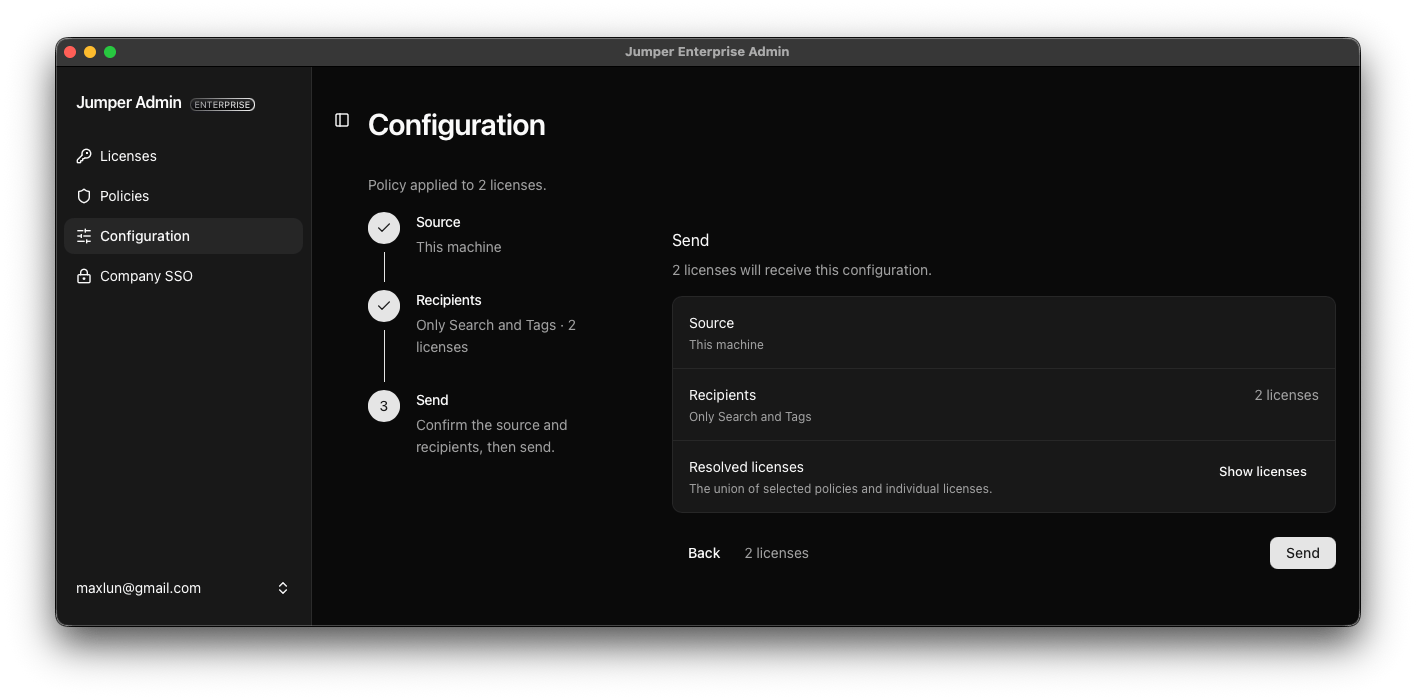
 Confirm the source and recipients. Use **Show licenses** to inspect the complete recipient list, then click **Send**. A license selected through both a policy and the individual list is included only once.
 To distribute a revised setup, prepare the changes and send the configuration again to the intended recipients.
## What the editor sees
On a new machine, the editor opens Jumper, enters their assigned Enterprise license key, and clicks **Apply**.
Jumper then runs the organization setup automatically:
1. Load the license's organization policy.
2. Download the settings bundle and import the managed settings.
3. Download the configured models and activate the visual model.
4. Load an allowed analysis folder.
To distribute a revised setup, prepare the changes and send the configuration again to the intended recipients.
## What the editor sees
On a new machine, the editor opens Jumper, enters their assigned Enterprise license key, and clicks **Apply**.
Jumper then runs the organization setup automatically:
1. Load the license's organization policy.
2. Download the settings bundle and import the managed settings.
3. Download the configured models and activate the visual model.
4. Load an allowed analysis folder.
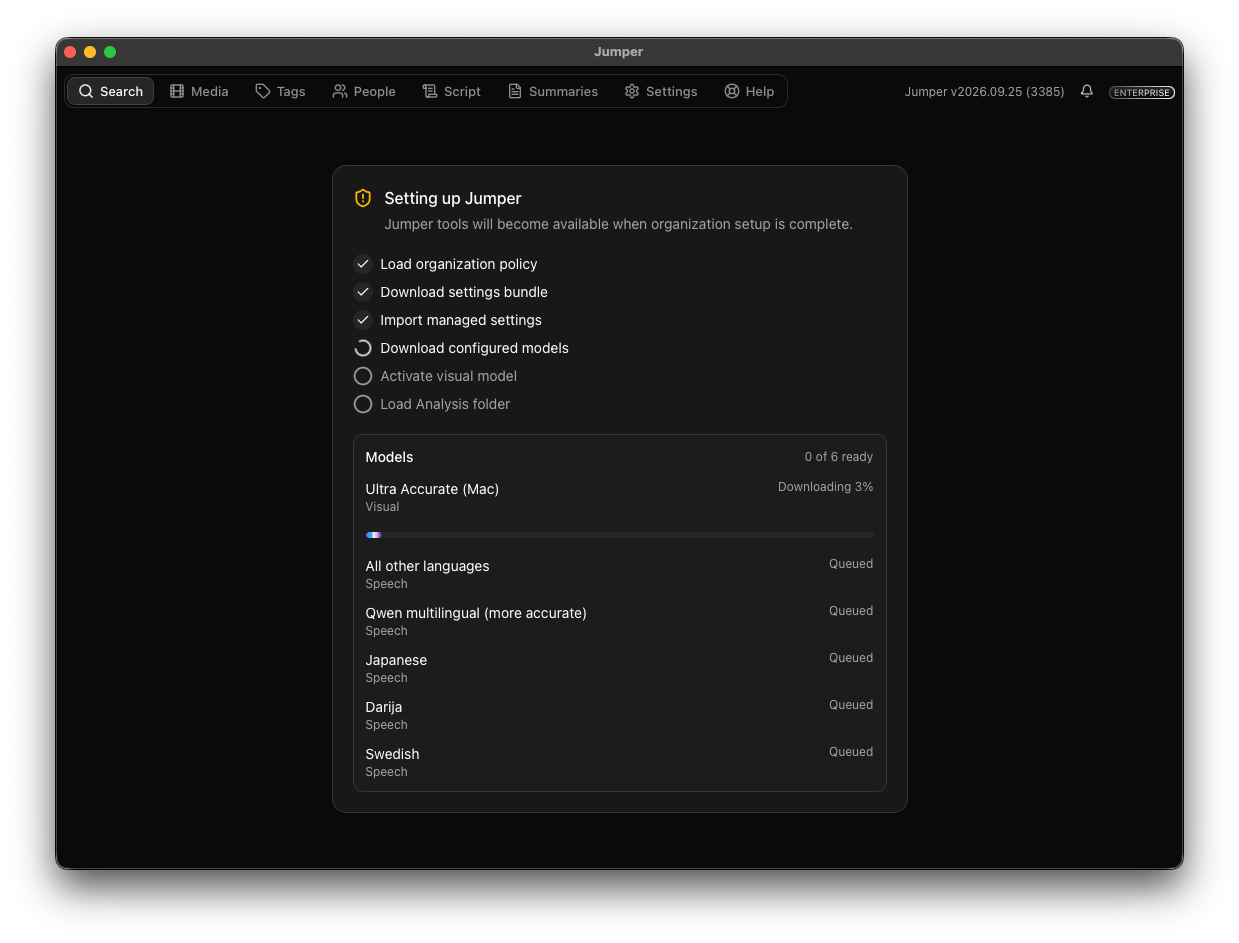 The first setup can take time while models download. When **Jumper is ready** appears, the editor clicks **OK** and starts searching the prepared media. With the analysis already available, there is no need to analyze the footage again or manually choose the models and UI settings.
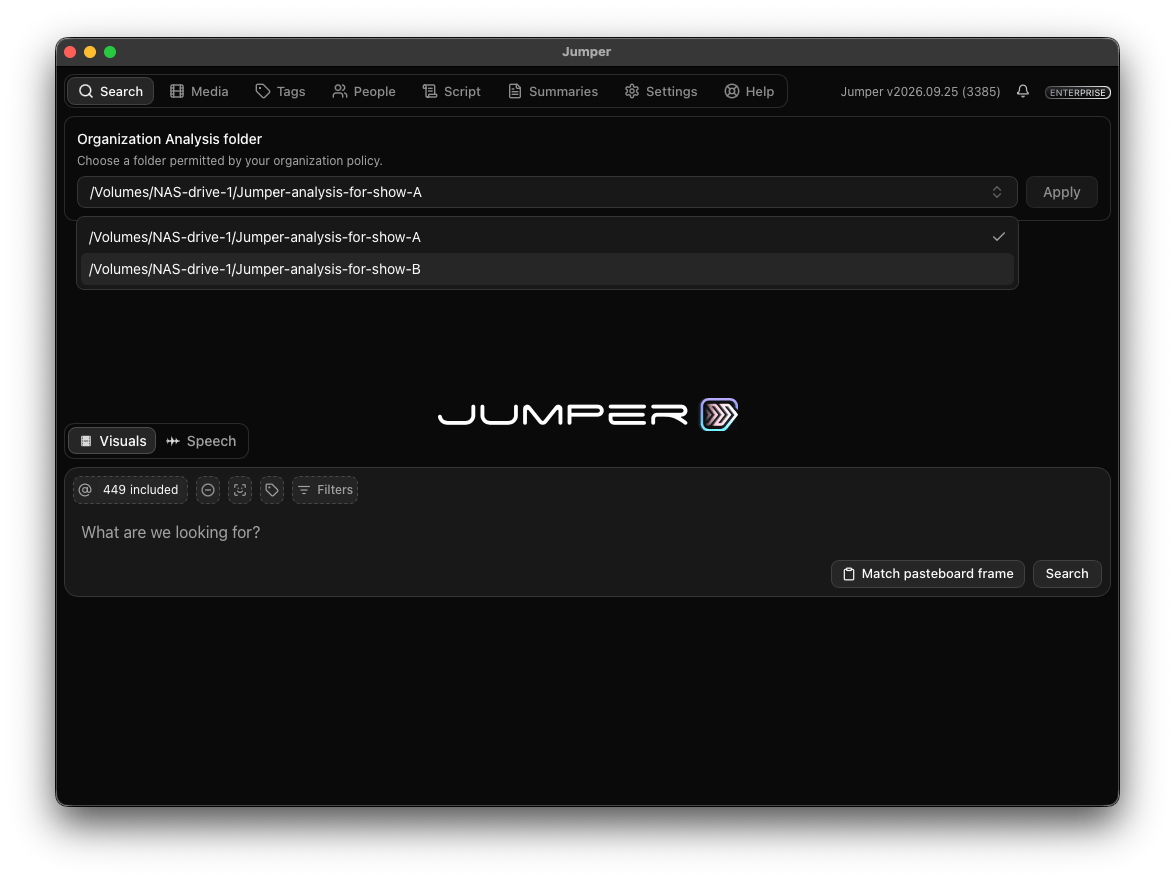
The assigned policy determines which tabs the editor can use. When several analysis folders are permitted, the editor can switch between them with the **Organization Analysis folder** selector and click **Apply**. In the example below, only the Show A and Show B folders are available.
The first setup can take time while models download. When **Jumper is ready** appears, the editor clicks **OK** and starts searching the prepared media. With the analysis already available, there is no need to analyze the footage again or manually choose the models and UI settings.
The assigned policy determines which tabs the editor can use. When several analysis folders are permitted, the editor can switch between them with the **Organization Analysis folder** selector and click **Apply**. In the example below, only the Show A and Show B folders are available.
 ## Configure company SSO
Use **Company SSO** to connect your organization's identity provider through **OpenID Connect (OIDC)**. The Admin Panel supports one OIDC connection for the organization.
Get the connection details from your identity provider administrator, then:
1. Open **Company SSO**.
2. Enter the **Issuer URL**, **Client ID**, and **Client secret**.
3. Click **Save candidate** to save the proposed connection.
4. Click **Test login** and complete the sign-in in your system browser.
5. Return to the Admin Panel and confirm that the status is **Enabled**.
## Configure company SSO
Use **Company SSO** to connect your organization's identity provider through **OpenID Connect (OIDC)**. The Admin Panel supports one OIDC connection for the organization.
Get the connection details from your identity provider administrator, then:
1. Open **Company SSO**.
2. Enter the **Issuer URL**, **Client ID**, and **Client secret**.
3. Click **Save candidate** to save the proposed connection.
4. Click **Test login** and complete the sign-in in your system browser.
5. Return to the Admin Panel and confirm that the status is **Enabled**.
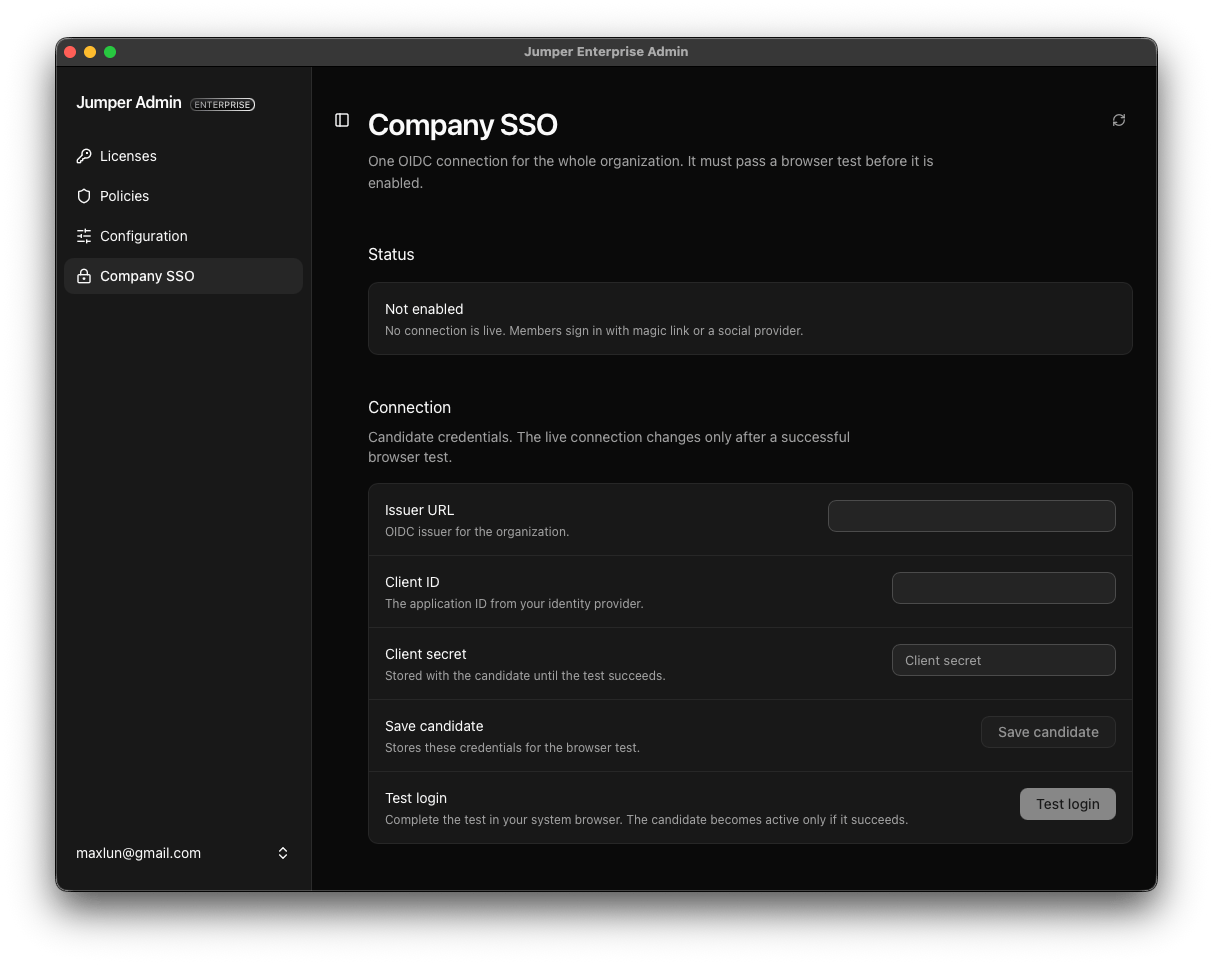 The connection becomes active only after a successful browser test. When replacing an existing connection, the current connection remains active until the replacement passes its test.
Once configured, users can enter their work email on the sign-in screen and select **Company SSO**.
For help setting up Enterprise licenses or your organization's SSO connection, contact [Jumper support](mailto:hello@getjumper.io).
The connection becomes active only after a successful browser test. When replacing an existing connection, the current connection remains active until the replacement passes its test.
Once configured, users can enter their work email on the sign-in screen and select **Company SSO**.
For help setting up Enterprise licenses or your organization's SSO connection, contact [Jumper support](mailto:hello@getjumper.io).