> ## Documentation Index
> Fetch the complete documentation index at: https://docs.getjumper.io/llms.txt
> Use this file to discover all available pages before exploring further.
# Using Jumper with Bionic
> Set up a free, private AI agent on your own machine that can search your footage and build timelines in Jumper.
[Bionic](https://lmstudio.ai/bionic) runs an AI agent on your own computer, so you can ask for what you need in plain language: *"find three good shots of the harbour at sunset"*. The agent searches your footage, looks at what comes back, and tells you which shots are worth using.
Nothing is sent to a cloud AI service, and there is no subscription to pay for.
Bionic is our recommended agent app. It is built for the kind of multi-step work editing involves, and it can look at your footage without any extra setup. Expect to spend about ten minutes on this.
## Before you begin
* Jumper is installed and running
* You have [media analyzed](/core-concepts/processing) in Jumper
* Your computer can run a local AI model
Bigger models need more memory. Check what your machine can handle at [canirun.ai](https://canirun.ai), or read the memory estimate Bionic shows next to each model.
If a model turns out to be too slow, download a smaller one. Nothing breaks.
## Setting it up
Download it from [lmstudio.ai/bionic](https://lmstudio.ai/bionic) and install it like any other app.
Open the model picker and download a **Local** model, meaning one that runs on your own machine rather than in the cloud.
Two labels matter when you are choosing:
* **Tool Use.** Required. Without it, the model cannot operate Jumper at all.
* **Vision.** Recommended. This is what lets the agent look at your footage.
**Gemma 4** and **Qwen 3.5** are good families to start with. Pick the largest size your machine handles comfortably, and remember you can swap it later.
Bionic also runs **Cloud** models, which are larger and faster but billed to your account. It can use **Remote** models as well, running on another computer on your network over LM Link.
Both work with Jumper. Only **Local** keeps everything on this machine.
Go to **Settings → Connected Apps**, find **Manual MCP server setup**, and click **+ Add custom MCP**.
Fill in the configuration:
* **Name**: `Jumper`
* **Connection**: **Web address**. Jumper runs as a local server rather than a command, so **On this computer** is the wrong option here.
* **Server address**: `http://127.0.0.1:6699/mcp`
* **Authentication**: **Automatic**
Click **Add MCP**, then quit and reopen Bionic. Connections do not always take effect until you restart.
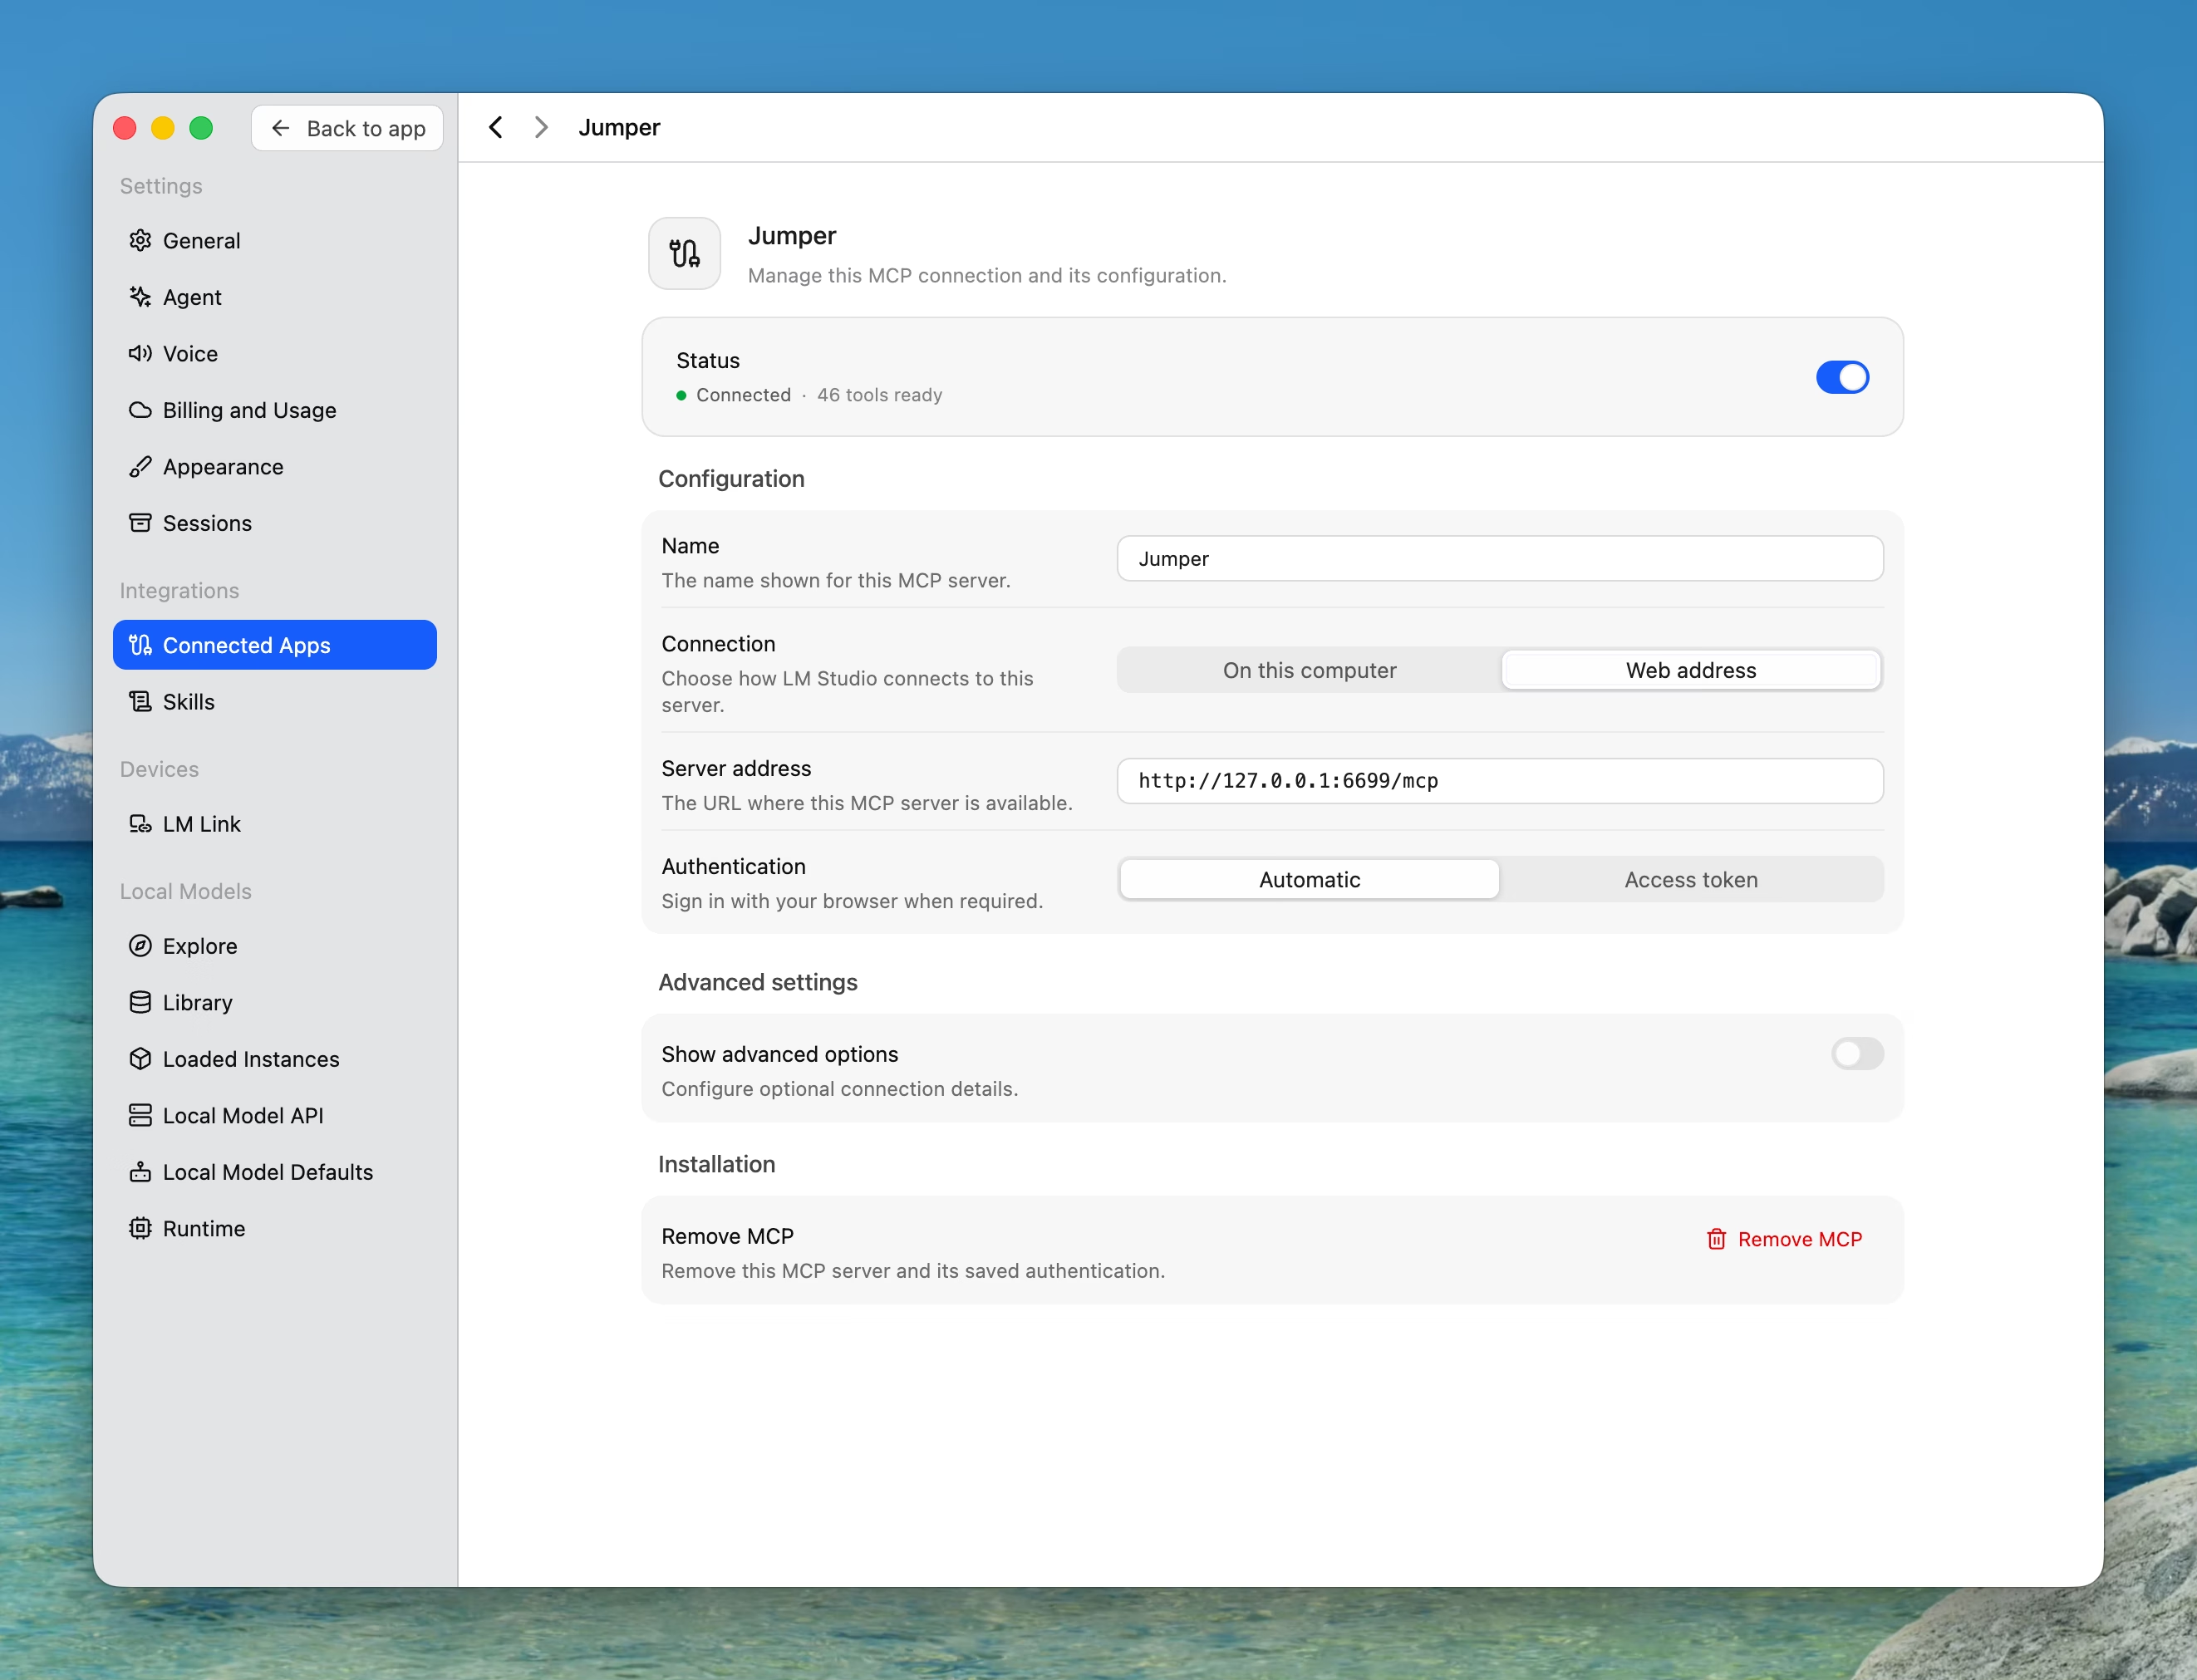 Once it is working, **Status** reads **Connected** and tells you how many Jumper tools are ready.
Bionic reads the same `mcp.json` that LM Studio uses, which lives at `~/.lmstudio/mcp.json` on macOS:
```json theme={null}
{
"mcpServers": {
"jumper": {
"url": "http://127.0.0.1:6699/mcp"
}
}
}
```
Because the two apps share this file, setting Jumper up in one of them configures it in the other.
Already followed the [LM Studio guide](/guides/lm-studio)? Then Jumper is configured already, since Bionic reads the same settings. Check that Jumper appears under **Connected Apps** and move on.
An agent that cannot see its own results is guessing from filenames, metadata, and search scores. One that can see will judge the shot, which is the difference between finding footage and finding the right footage.
If the model you downloaded has **Vision**, you are already covered. Skip ahead.
If it does not, Bionic can borrow a second model just for looking at pictures. Turn on the **Vision Subagent** in settings and choose a vision-capable model for it. You will see *"Asking vision subagent…"* whenever the agent stops to look at something.
A small, fast model as the vision subagent is often quicker than pushing every frame through a large main model. That is worth trying even when your main model already has Vision.
Start a session and ask something simple:
```
Can you use Jumper?
```
A working setup answers by describing what it can do with your footage. A broken one tells you it has no access.
Then try a real request:
```
Find three shots of someone walking outdoors and tell me which is best.
```
That exercises search, thumbnails, and the agent's ability to look at frames in a single go. If it works, you are set up.
## What you can ask for
The agent searches by what a shot looks like, by what is said in it, and by who appears in it. It can export clips for you, and it can read a timeline out of Premiere Pro, DaVinci Resolve, or Avid Media Composer and send an edited version back.
See [Agentic video editing](/core-concepts/agentic-editing) for the full picture, and [Timeline import and export](/core-concepts/agentic-editing#timeline-import-and-export) for round-trips with your NLE.
## If something is not working
Jumper itself has to be running, because the connection only exists while the app is open. Open Jumper, then restart Bionic.
If you added Jumper by editing `mcp.json` by hand, check that the file is still valid JSON. A stray comma is enough to stop it loading.
Two things to check. First, that your model has **Tool Use**, because without it the model cannot call Jumper however it is configured. Second, that Jumper is switched on under **Settings → Connected Apps**.
It cannot see what it found. Either switch to a model with **Vision**, or turn on the **Vision Subagent** as described above.
Searching a large library can take longer than Bionic is willing to wait. The default is 60 seconds, which is not always enough, so raise **Request timeout (seconds)** in settings.
The model is too big for your machine. Download a smaller size, or lower the context length in the model's load settings.
Jumper asks the local server to describe frames, and it uses the first model the server reports. If you have an embedding model loaded alongside your vision model, unload it so the vision model is the one answering.
## For the curious
Jumper runs a local MCP server at `http://127.0.0.1:6699/mcp`, which is the same mechanism Claude and Codex use to talk to it.
Adding Jumper under **Connected Apps** points Bionic at that address. Both ends sit on `127.0.0.1`, so nothing leaves your machine.
Jumper's `get_thumbnail` tool writes a JPEG to disk and returns the path to it. The `describe_thumbnail` tool then sends that image to a local OpenAI-compatible server on port `1234`, and the short description that comes back is what the agent actually reads.
Bionic starts that server itself, with just-in-time model loading, so there is nothing to switch on. You will find it under **Settings → Local Model API**, or you can confirm it from a terminal:
```bash theme={null}
curl http://localhost:1234/v1/models
```
LM Studio requires you to start the same server by hand from the menu bar every time. Bionic does not.
One consequence is worth knowing: `describe_thumbnail` uses the first model the server reports, which is why a stray embedding model can break the descriptions.
Bionic's **vision subagent** is a separate mechanism. It handles images inside the conversation itself, which is how a text-only main model can still reason about what a shot contains.
Bionic and LM Studio are made by the same team and share a configuration directory, `~/.lmstudio` on macOS. That covers `mcp.json`, your downloaded models, and more besides.
In practice you can install both, configure Jumper once, and switch between them freely. Models you have already downloaded show up in either app.
| | Bionic | LM Studio |
| ------------------------- | ------------------------------------ | --------------------------------- |
| Connecting Jumper | **Connected Apps** UI, or `mcp.json` | `mcp.json` via **Integrations** |
| Local server on port 1234 | Automatic | Started by hand from the menu bar |
| Seeing thumbnails | Vision subagent, built in | Images pasted in by hand |
| Designed for | Multi-step agent work | Chat with tools |
Both work well. Bionic needs less setup and handles long, multi-step jobs more gracefully, while LM Studio's chat window is a friendlier place to experiment with a lot of different models.
## Related
Other agent apps you can use with Jumper
The same setup in LM Studio's chat app
Overview of how AI agents use Jumper
What stays local and what the model actually receives
Once it is working, **Status** reads **Connected** and tells you how many Jumper tools are ready.
Bionic reads the same `mcp.json` that LM Studio uses, which lives at `~/.lmstudio/mcp.json` on macOS:
```json theme={null}
{
"mcpServers": {
"jumper": {
"url": "http://127.0.0.1:6699/mcp"
}
}
}
```
Because the two apps share this file, setting Jumper up in one of them configures it in the other.
Already followed the [LM Studio guide](/guides/lm-studio)? Then Jumper is configured already, since Bionic reads the same settings. Check that Jumper appears under **Connected Apps** and move on.
An agent that cannot see its own results is guessing from filenames, metadata, and search scores. One that can see will judge the shot, which is the difference between finding footage and finding the right footage.
If the model you downloaded has **Vision**, you are already covered. Skip ahead.
If it does not, Bionic can borrow a second model just for looking at pictures. Turn on the **Vision Subagent** in settings and choose a vision-capable model for it. You will see *"Asking vision subagent…"* whenever the agent stops to look at something.
A small, fast model as the vision subagent is often quicker than pushing every frame through a large main model. That is worth trying even when your main model already has Vision.
Start a session and ask something simple:
```
Can you use Jumper?
```
A working setup answers by describing what it can do with your footage. A broken one tells you it has no access.
Then try a real request:
```
Find three shots of someone walking outdoors and tell me which is best.
```
That exercises search, thumbnails, and the agent's ability to look at frames in a single go. If it works, you are set up.
## What you can ask for
The agent searches by what a shot looks like, by what is said in it, and by who appears in it. It can export clips for you, and it can read a timeline out of Premiere Pro, DaVinci Resolve, or Avid Media Composer and send an edited version back.
See [Agentic video editing](/core-concepts/agentic-editing) for the full picture, and [Timeline import and export](/core-concepts/agentic-editing#timeline-import-and-export) for round-trips with your NLE.
## If something is not working
Jumper itself has to be running, because the connection only exists while the app is open. Open Jumper, then restart Bionic.
If you added Jumper by editing `mcp.json` by hand, check that the file is still valid JSON. A stray comma is enough to stop it loading.
Two things to check. First, that your model has **Tool Use**, because without it the model cannot call Jumper however it is configured. Second, that Jumper is switched on under **Settings → Connected Apps**.
It cannot see what it found. Either switch to a model with **Vision**, or turn on the **Vision Subagent** as described above.
Searching a large library can take longer than Bionic is willing to wait. The default is 60 seconds, which is not always enough, so raise **Request timeout (seconds)** in settings.
The model is too big for your machine. Download a smaller size, or lower the context length in the model's load settings.
Jumper asks the local server to describe frames, and it uses the first model the server reports. If you have an embedding model loaded alongside your vision model, unload it so the vision model is the one answering.
## For the curious
Jumper runs a local MCP server at `http://127.0.0.1:6699/mcp`, which is the same mechanism Claude and Codex use to talk to it.
Adding Jumper under **Connected Apps** points Bionic at that address. Both ends sit on `127.0.0.1`, so nothing leaves your machine.
Jumper's `get_thumbnail` tool writes a JPEG to disk and returns the path to it. The `describe_thumbnail` tool then sends that image to a local OpenAI-compatible server on port `1234`, and the short description that comes back is what the agent actually reads.
Bionic starts that server itself, with just-in-time model loading, so there is nothing to switch on. You will find it under **Settings → Local Model API**, or you can confirm it from a terminal:
```bash theme={null}
curl http://localhost:1234/v1/models
```
LM Studio requires you to start the same server by hand from the menu bar every time. Bionic does not.
One consequence is worth knowing: `describe_thumbnail` uses the first model the server reports, which is why a stray embedding model can break the descriptions.
Bionic's **vision subagent** is a separate mechanism. It handles images inside the conversation itself, which is how a text-only main model can still reason about what a shot contains.
Bionic and LM Studio are made by the same team and share a configuration directory, `~/.lmstudio` on macOS. That covers `mcp.json`, your downloaded models, and more besides.
In practice you can install both, configure Jumper once, and switch between them freely. Models you have already downloaded show up in either app.
| | Bionic | LM Studio |
| ------------------------- | ------------------------------------ | --------------------------------- |
| Connecting Jumper | **Connected Apps** UI, or `mcp.json` | `mcp.json` via **Integrations** |
| Local server on port 1234 | Automatic | Started by hand from the menu bar |
| Seeing thumbnails | Vision subagent, built in | Images pasted in by hand |
| Designed for | Multi-step agent work | Chat with tools |
Both work well. Bionic needs less setup and handles long, multi-step jobs more gracefully, while LM Studio's chat window is a friendlier place to experiment with a lot of different models.
## Related
Other agent apps you can use with Jumper
The same setup in LM Studio's chat app
Overview of how AI agents use Jumper
What stays local and what the model actually receives