> ## Documentation Index
> Fetch the complete documentation index at: https://docs.getjumper.io/llms.txt
> Use this file to discover all available pages before exploring further.
# Media tab
> The Media tab is where you manage the media files that Jumper has access to
## Overview
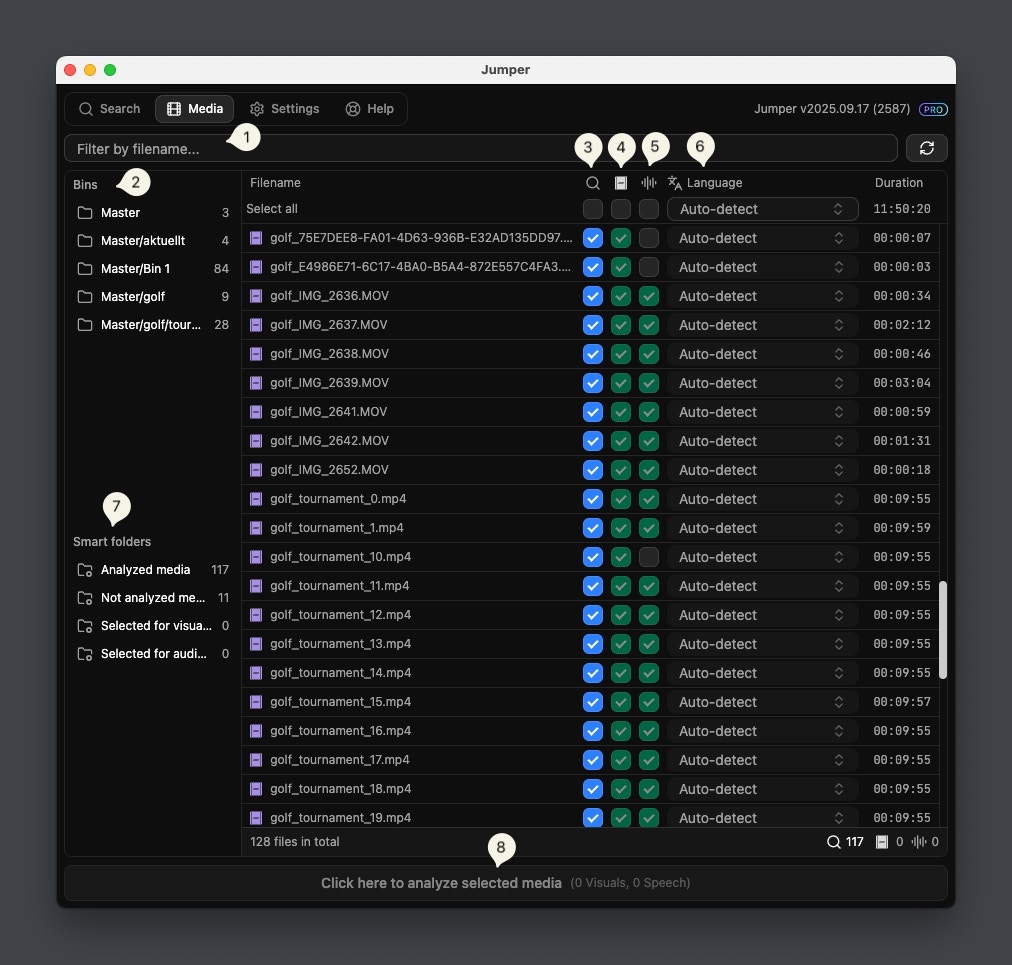
The Media tab is where you manage the analysis of your media files. You can mark files for analysis, monitor the analysis progress, and control which files are included in searches.
 | Feature | Description |
| ----------------------------------- | -------------------------------------------------------------------------------------------------------------------------------------------------------------------------------------------------------------------------------------- |
| **Filter by filename** | Filter the table by filename. |
| **Filter by bin** | These are the bins from your project in the editing software. |
| **Include in search column** | This column controls which files Jumper will search in. |
| **Mark for Visual analysis column** | In this column you mark files for visual analysis. A green checkmark means this file has been visually analyzed. |
| **Mark for Speech analysis column** | In this column you mark files for speech analysis. A green checkmark means this file has been analyzed for speech. |
| **Select Language of speech** | In this column you can specify the language for Speech analysis. For example, if you know that the spoken language in a particular file is Portuguese, you can select it in the language dropdown for improved transcription accuracy. |
| **Smart folders** | Filter the table by rules (e.g. analyzed, not analyzed, file type). See [Smart Folders](/guides/smart-folders) and [Smart folders reference](/reference/smart-folders). |
| **Start analysis button** | After selecting media for visual and/or speech analysis, you need to click this button to start the analysis. |
## How to populate the Media table
The way you populate the Media table varies depending on whether you're running Jumper in **Standalone** mode or as a **Plugin**. Use the table below to find the method that matches your workflow:
| Mode | How to Add Media |
| ------------------------------------- | ------------------------------------------------------------------------------------------------------------------------------------------------------------------------------------------------------------------------------------------------------------------------------------------------------------------------------------------------------------------------------------------------------------------- |
| **Standalone App** | Click the Add media... button at the top right of the Media panel, then select the desired files or folders from your system. |
| **Final Cut Pro** | Drag-and-drop your **Events** or **Libraries** from Final Cut Pro directly into the Media panel. |
| **Premiere Pro**, **Davinci Resolve** | The Media table is populated automatically from your current project. If you add or remove media from your project, you can use the button to resync the Media table. |
| **Avid Media Composer** | For transcoded MXF in `Avid MediaFiles`, run **Scan MXF Metadata** first if the files have not been analyzed. Analyzed MXF can load without scanning. Then use the **Load Media** dropdown (**All Selected Clips**, **All Visible Clips**, **All Bins**, or **All Avid Accessible Clips**). Linked/AMA clips load directly without scanning. See [Adding media](/NLE/avid/avid-adding-media) for the full workflow. |
## Clearing the Media table
In the Standalone app you can clear the Media table by clicking the Clear button at the top right of the Media panel. Clearing the Media table will remove all the files from the table, but will not delete any files on your system or the analysis files from the analysis folder.
## Analysis progress
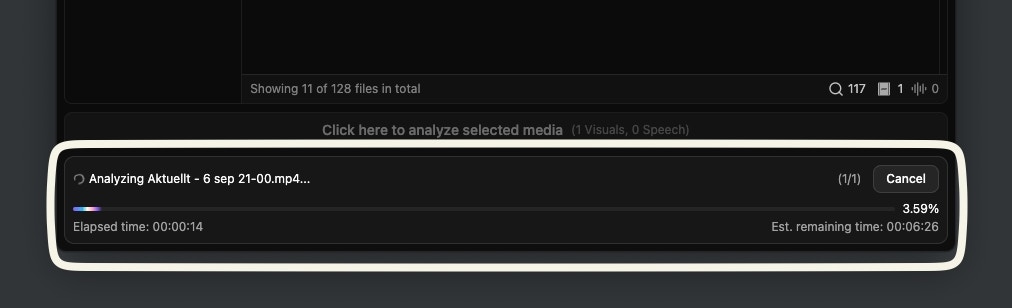
When analyzing media, an analysis progress indicator is shown at the bottom of the window. It shows the current file being analyzed, that file's progress, elapsed time, and estimated time remaining.
By clicking the `Cancel` button in the top right corner, you will abort the analysis of this and any other media queued for analysis.
| Feature | Description |
| ----------------------------------- | -------------------------------------------------------------------------------------------------------------------------------------------------------------------------------------------------------------------------------------- |
| **Filter by filename** | Filter the table by filename. |
| **Filter by bin** | These are the bins from your project in the editing software. |
| **Include in search column** | This column controls which files Jumper will search in. |
| **Mark for Visual analysis column** | In this column you mark files for visual analysis. A green checkmark means this file has been visually analyzed. |
| **Mark for Speech analysis column** | In this column you mark files for speech analysis. A green checkmark means this file has been analyzed for speech. |
| **Select Language of speech** | In this column you can specify the language for Speech analysis. For example, if you know that the spoken language in a particular file is Portuguese, you can select it in the language dropdown for improved transcription accuracy. |
| **Smart folders** | Filter the table by rules (e.g. analyzed, not analyzed, file type). See [Smart Folders](/guides/smart-folders) and [Smart folders reference](/reference/smart-folders). |
| **Start analysis button** | After selecting media for visual and/or speech analysis, you need to click this button to start the analysis. |
## How to populate the Media table
The way you populate the Media table varies depending on whether you're running Jumper in **Standalone** mode or as a **Plugin**. Use the table below to find the method that matches your workflow:
| Mode | How to Add Media |
| ------------------------------------- | ------------------------------------------------------------------------------------------------------------------------------------------------------------------------------------------------------------------------------------------------------------------------------------------------------------------------------------------------------------------------------------------------------------------- |
| **Standalone App** | Click the Add media... button at the top right of the Media panel, then select the desired files or folders from your system. |
| **Final Cut Pro** | Drag-and-drop your **Events** or **Libraries** from Final Cut Pro directly into the Media panel. |
| **Premiere Pro**, **Davinci Resolve** | The Media table is populated automatically from your current project. If you add or remove media from your project, you can use the button to resync the Media table. |
| **Avid Media Composer** | For transcoded MXF in `Avid MediaFiles`, run **Scan MXF Metadata** first if the files have not been analyzed. Analyzed MXF can load without scanning. Then use the **Load Media** dropdown (**All Selected Clips**, **All Visible Clips**, **All Bins**, or **All Avid Accessible Clips**). Linked/AMA clips load directly without scanning. See [Adding media](/NLE/avid/avid-adding-media) for the full workflow. |
## Clearing the Media table
In the Standalone app you can clear the Media table by clicking the Clear button at the top right of the Media panel. Clearing the Media table will remove all the files from the table, but will not delete any files on your system or the analysis files from the analysis folder.
## Analysis progress
When analyzing media, an analysis progress indicator is shown at the bottom of the window. It shows the current file being analyzed, that file's progress, elapsed time, and estimated time remaining.
By clicking the `Cancel` button in the top right corner, you will abort the analysis of this and any other media queued for analysis.
 ## Right-click options
By right-clicking a media file, you can:
* **Reveal in Finder** (macOS) or **Reveal in File Explorer** (Windows) — Open the file's location on the filesystem
* **Show analysis files** — Access the analysis files for that file. If you delete the analysis files, you will need to re-analyze the file
* **Open Script Editor** (for files analyzed for speech) — Open the full transcript in the [Script Editor](/guides/script-editor)
## Right-click options
By right-clicking a media file, you can:
* **Reveal in Finder** (macOS) or **Reveal in File Explorer** (Windows) — Open the file's location on the filesystem
* **Show analysis files** — Access the analysis files for that file. If you delete the analysis files, you will need to re-analyze the file
* **Open Script Editor** (for files analyzed for speech) — Open the full transcript in the [Script Editor](/guides/script-editor)
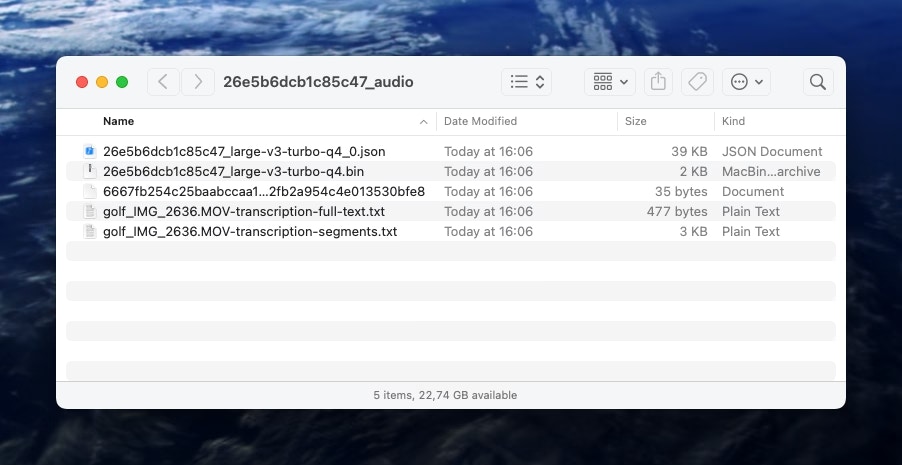
 If you click `Reveal Speech Analysis...` you will find two plain text files with the actual transcriptions.
1. `transcription-full-text.txt` contains the entire transcript
2. `transcription-segments.txt` contains the entire transcript but segmented with time codes
If you click `Reveal Speech Analysis...` you will find two plain text files with the actual transcriptions.
1. `transcription-full-text.txt` contains the entire transcript
2. `transcription-segments.txt` contains the entire transcript but segmented with time codes