General
How fast is the search?
How fast is the search?
How long does the analysis take?
How long does the analysis take?
- Your machine
- The resolution of the footage
- The model you are using
What hardware provides the fastest analysis?
What hardware provides the fastest analysis?
How does Jumper perform with large libraries (e.g., 15,000+ files)?
How does Jumper perform with large libraries (e.g., 15,000+ files)?
How does Jumper handle multi-channel audio?
How does Jumper handle multi-channel audio?
Licensing & Account management
How does licensing work for multiple computers?
How does licensing work for multiple computers?
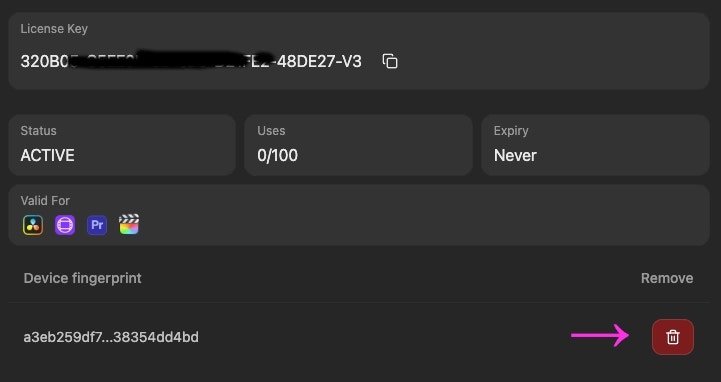
How do I use my license key on another computer?
How do I use my license key on another computer?
Is there support for a truly offline workflow?
Is there support for a truly offline workflow?
How can I cancel my subscription?
How can I cancel my subscription?
How can I change my payment method?
How can I change my payment method?
How can I get a refund?
How can I get a refund?
Privacy & Data
Is any part of my footage uploaded during analysis?
Is any part of my footage uploaded during analysis?
Is my analyzed media content used by Jumper to train AI models?
Is my analyzed media content used by Jumper to train AI models?
Does Jumper require an Internet connection?
Does Jumper require an Internet connection?
What information is sent to Jumper's servers?
What information is sent to Jumper's servers?
What firewall settings do I need?
What firewall settings do I need?
api.keygen.sh domain in your firewall settings.Storage & Files
Does the analysis create any significant amount of data on the disk?
Does the analysis create any significant amount of data on the disk?
Does the analysis database remain persistent, or does clicking 'Clear Media' delete the analysis files?
Does the analysis database remain persistent, or does clicking 'Clear Media' delete the analysis files?
Can I transfer the Analysis Files to another editor's machine?
Can I transfer the Analysis Files to another editor's machine?
- Open the
Terminal.appfrom Spotlight, and navigate to the cache directory:
jumper-cache folder to the same location on the other editor’s machine.Will copying the cache overwrite existing files on the receiving machine?
Will copying the cache overwrite existing files on the receiving machine?
Can I change the location of my Analysis Files folder?
Can I change the location of my Analysis Files folder?
Settings tab in Jumper.Permissions
Why does Jumper need Accessibility permission?
Why does Jumper need Accessibility permission?
Why does Jumper need Screen Recording permission?
Why does Jumper need Screen Recording permission?
Why does Jumper ask for Full Disk Access?
Why does Jumper ask for Full Disk Access?
Do I need to give all these permissions?
Do I need to give all these permissions?
Search & Metadata
Can I search for file paths or technical metadata (like FPS or Camera Model)?
Can I search for file paths or technical metadata (like FPS or Camera Model)?
What is the best way to find a specific frame?
What is the best way to find a specific frame?
Workflow & Integration
Can Jumper replicate or view my existing folder/directory structure?
Can Jumper replicate or view my existing folder/directory structure?
How does Jumper handle Multicam sequences and Proxies?
How does Jumper handle Multicam sequences and Proxies?
Is there a 'watch folder' feature to automatically analyze new media?
Is there a 'watch folder' feature to automatically analyze new media?
What keyboard shortcuts does Jumper need in DaVinci Resolve?
What keyboard shortcuts does Jumper need in DaVinci Resolve?
What keyboard shortcuts does Jumper need in Avid Media Composer?
What keyboard shortcuts does Jumper need in Avid Media Composer?